I'm not much of a writer, but my passion for sharing my DIY Projects has inspired me. We just moved downtown, very urban, contemporary, young, and I decided that our headboard needed an update.
 |
| This was my 'pin-spiration' and I followed her instructions almost step by step! |
(Thanks, Sarah!) You can find her detailed instructions here. I did use her plans when I was doing my project, frankly, because she made it easy, and luckily for me, my bed is almost exactly the same size.
And here is how mine turned out:


My Project breakdown in photography:
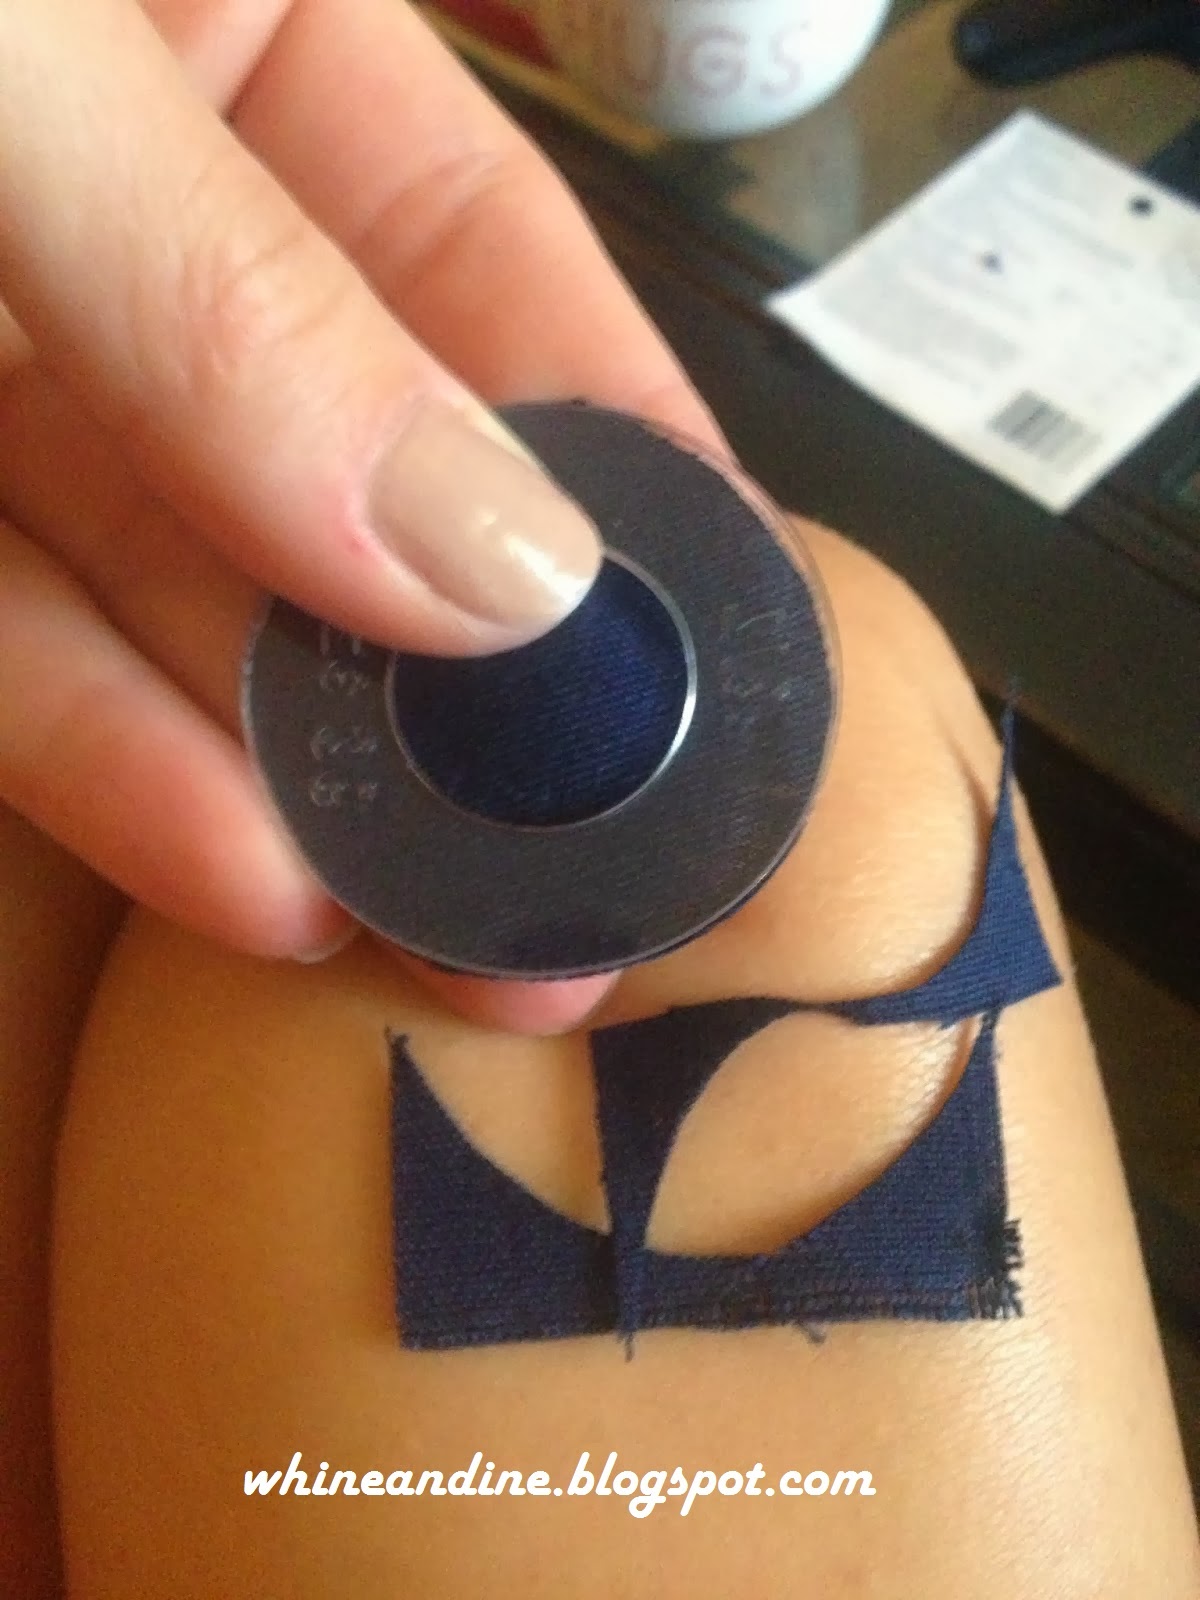
I first made 28 buttons with the matching Navy Linen fabric (that I got on a Labor Day sale-50% off). I followed the instructions on the box, since I had never made my own buttons before, and it turned out to be a really easy first step.

This took me about an hour in front of the TV, and I did finish each with a dab of Gorilla Glue to keep them from popping off...pretty simple, but monotonous!

Step one in the actual 'wood-working' involved lots of measuring and re-measuring where to drill the button holes. After this, I drilled the holes in the plywood that I would later thread the buttons through.


After the holes were drilled for the buttons, I screwed together the 1x4s into the edges of the plywood for extra support and stability. (This turned out to be pretty important because that large of a piece of plywood turned out to be pretty floppy.)
Next step was adding the foam, that you can see sticking out from underneath the edges. I used a queen size mattress pad that turned out to be about the same cost as buying it elsewhere. I cut mine by hand with a pair of scissors, it turned out to be no problem that it wasn't exact, because you'll pull the edges taut next.

Following this came the batting- and then the fabric! It was finally starting to come together!
To prevent any slipping, I safety pinned the fabric to the foam while I was stapling it to the wood frame.

This step I did by myself in my apartment, but it would be helpful with a buddy! And ta-da! I was thrilled once the buttons were in! The project was coming together! We were moving during this project, and I decided- fearing risk of a wood fracture or split- that we would wait to attach the legs until we had moved.
A Tip on threading the buttons: It would be much easier with two people, and I finished the tufting by stapling the thread down and knotting it to prevent it slipping. Once I had a few staples in place, I hot glued over each end to really make sure none of those come loose!

My handyman helped me to drill pilot holes for the 4" screws that secured each of the 3" arms to the plywood tufted piece. I didn't cut holes for these screws in the fabric, and there was some pulling, but I was able to straighten these out with some more stapling and tugging on the back of the tufted piece.
I'm all about being frugal with these DIY projects--since I wouldn't splurge for the $400 headboard! Here's the cost breakdown:
5 yards of Linen Fabric - $24.95 - purchased at Hancock Fabrics, 50% off
Button Covers (2 packs, 14 each)- $10.98 - purchased at Hancock Fabrics, 50% off
Upholstery Needles - $3.29 - purchased from Hobby Lobby using 40% off coupon
Queen Size Mattress Pad, 1.5 inch thickness- $34.98- Purchased from Wal-Mart & cut to size
Quilt Batting - $9.97 - purchased from Wal-Mart - 84.17
500 Upholstery Tacks- $18.90 (including shipping) Purchased on Ebay
Hardware- Purchased at Lowe's Hardware
- 1/2 inch Plywood
- One 2 x 6 (12 ft)
- Two 1 x 6s (6 ft ea)
- 16, 1.25 inch screws
- 8, 4 inch screws - $53.91
Total Cost: $ 156.98
(60% cheaper than buying one!)
TIP!: Have all your boards cut at the hardware store, especially if you're in a tight space or don't own all the tools. The nice people at Lowe's were very helpful, and then they're already cut to size when you get them home!
- To save a little extra money, I ordered a $50 Lowe's gift card with my credit card reward points! and used coupons wherever I could.
It took me about three weeks to nail in all the upholstery tacks....because I would get so bored just hammering, and hammering. It was never ending. I was so antsy to use the headboard I did this after we had it placed behind the bed.
This piece was so heavy I didn't need to attach it to the wall, or the bed frame the arms helped to hold it steady. --this was a perk for me, since apartments don't like large anchors in the wall...
Voila! The finished product!

Yes, the bedroom's still coming together, but now that all the upholstery tacks are neatly in place, I am one step closer. :)
Next I'm due for a bed skirt and coordinating pillow shams. Lots of projects in the works at our place!
No comments:
Post a Comment